Install Nextcloud-Elasticsearch
This installation guide ist tested with Ubuntu 16.04 and Nextcloud 13.
We will install Elasticsearch as a service, install the Elasticsearch Ingest-Attachment Plugin for indexing office files like PDF, XLS (and more, about 1.000 different file types), install the Nextcloud Full Text Search App of the Nextcloud App store, install the ReadonlyREST Elasticsearch Plugin to permit/forbid accessing the index and finally install the live index as a service.
Prerequisites
If not already installed, install Java 8 and apt-transport-https
apt install apt-transport-https
Check Java Version
java -version
java version "1.8.0_171"
Java(TM) SE Runtime Environment (build 1.8.0_171-b11)
Java HotSpot(TM) 64-Bit Server VM (build 25.171-b11, mixed mode)
Install Elasticsearch
curl -L -O https://artifacts.elastic.co/downloads/elasticsearch/elasticsearch-6.2.4.deb
dpkg -i elasticsearch-6.2.4.deb
Start Elasticsearch
/etc/init.d/elasticsearch start
Test Elasticsearch
curl http://127.0.0.1:9200
{
 "name" : "gbqbjp7",
 "cluster_name" : "elasticsearch",
 "cluster_uuid" : "cP8B2VFDSqKjM_RmJF4CBQ",
 "version" : {
 "number" : "6.2.4",
 "build_hash" : "ccec39f",
 "build_date" : "2018-04-12T20:37:28.497551Z",
 "build_snapshot" : false,
 "lucene_version" : "7.2.1",
 "minimum_wire_compatibility_version" : "5.6.0",
 "minimum_index_compatibility_version" : "5.0.0"
 },
 "tagline" : "You Know, for Search"
}
Enable Elasticsearch Service
systemctl daemon-reload
systemctl enable elasticsearch
Synchronizing state of elasticsearch.service with SysV init with /lib/systemd/systemd-sysv-install...
Executing /lib/systemd/systemd-sysv-install enable elasticsearch
Created symlink from /etc/systemd/system/multi-user.target.wants/elasticsearch.service to /usr/lib/systemd/system/elasticsearch.service.
systemctl start elasticsearch
service elasticsearch restart
Install Elasticsearch Ingest-Attachment Plugin
The ingest attachment plugin lets Elasticsearch extract file attachments in common formats (such as PPT, XLS, and PDF) by using the Apache text extraction library Tika.
/usr/share/elasticsearch/bin/elasticsearch-plugin install ingest-attachment
Elasticsearch Config File
vi /etc/elasticsearch/elasticsearch.yml
network.host: 127.0.0.1
http.port: 9200
Elasticsearch Log Files
cd /var/log/elasticsearch
Increase Java heap size
By default, Elasticsearch tells the JVM to use a heap with a minimum and maximum size of 1 GB.
vi /etc/elasticsearch/jvm.options
# Heap is 1 GB (default)
#-Xms1g
#-Xmx1g

# Heap is 2 GB
-Xms2g
-Xmx2g
Add Elasticsearch Ports to Services
Port 9200 is for REST, port 9300 is for nodes communication.
vi /etc/services
elastic-rest 9200/tcp     # Nextcloud
elastic-node 9300/tcp     # Nextcloud
netstat -pat | grep elastic
tcp6   0   0   localhost:elastic-rest   [::]:*   LISTEN   17186/java
tcp6   0   0   localhost:elastic-node   [::]:*   LISTEN   17186/java
Now all prerequisites are installed, continue with the installation of the 3 full text search apps of the Nextcloud store.
Install Nextcloud Apps
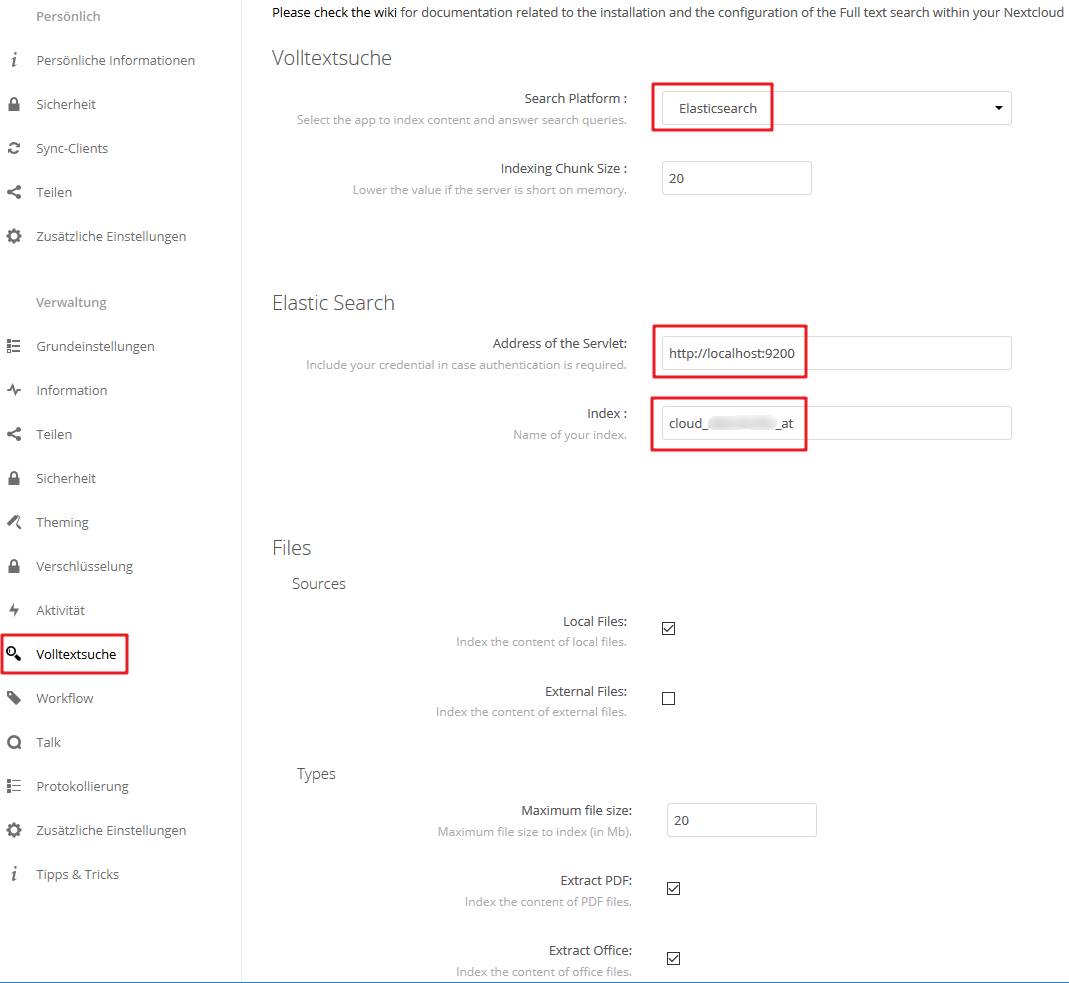
Configure Full Text Search App
Navigate to Admin Console | Full text search and configure the Search platform, Address of Servlet and Name of your index (should be in lower case).

Your full text search engine is now configured and ready for a first run.
First Index
Run the command
sudo -u www-data php occ fulltextsearch:index
Install ReadonlyREST Elasticsearch Plugin

ReadonlyREST is a plugin that adds encryption, authentication, authorization and access control capabilities to Elasticsearch embedded REST API.
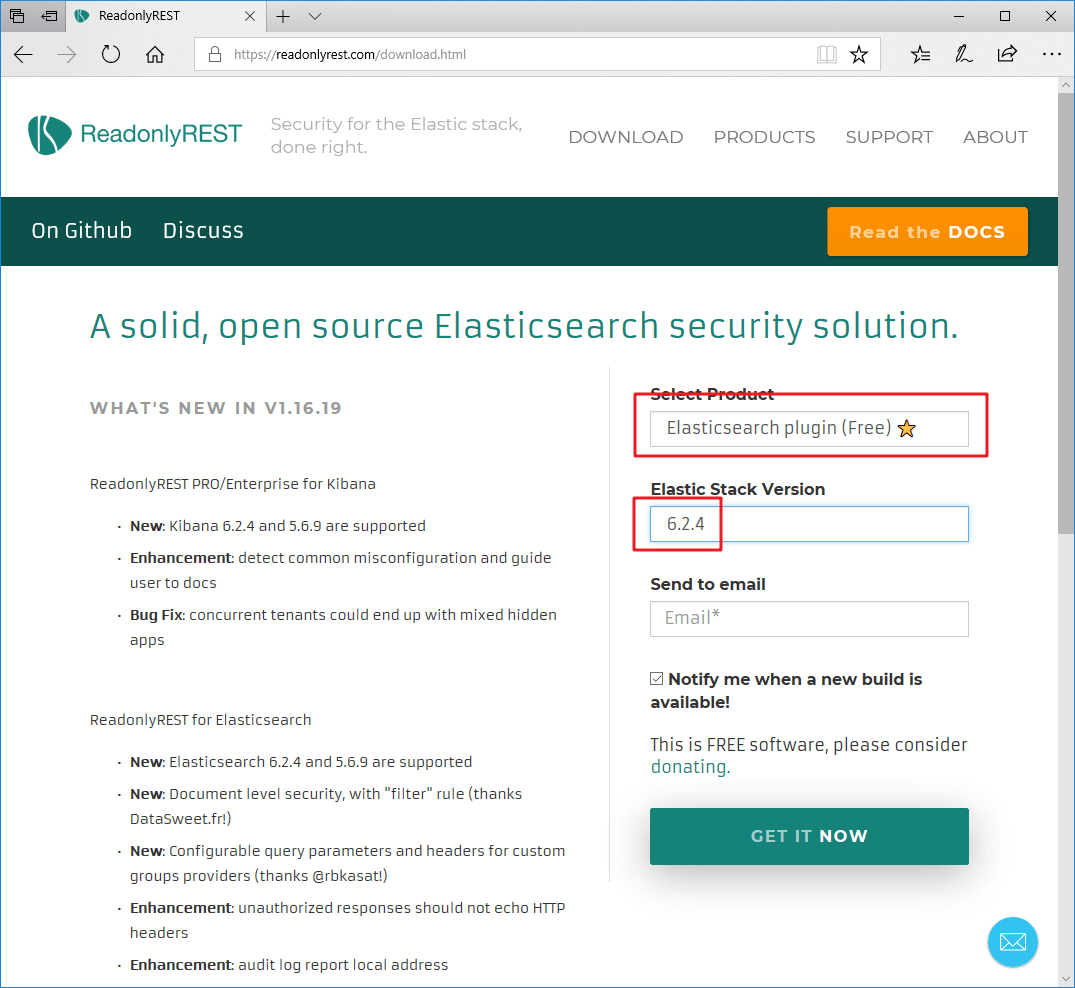
Got to the official download page readonlyrest.com/download and send yourself a mail with the download link.

After downloading, cd to /usr/share/elasticsearch and install the plugin.
cd /usr/share/elasticsearchbin/elasticsearch-plugin install file:///download-folder/readonlyrest-1.16.19_es6.2.4.zip
-> Downloading file:///download-folder/readonlyrest-1.16.19_es6.2.4.zip
[=================================================] 100%??
@@@@@@@@@@@@@@@@@@@@@@@@@@@@@@@@@@@@@@@@@@@@@@@@@@@@@@@@@@@
@ WARNING: plugin requires additional permissions @
@@@@@@@@@@@@@@@@@@@@@@@@@@@@@@@@@@@@@@@@@@@@@@@@@@@@@@@@@@@
* java.io.FilePermission << ALL FILES >> read
* java.lang.RuntimePermission accessDeclaredMembers
* java.lang.RuntimePermission getClassLoader
* java.lang.reflect.ReflectPermission suppressAccessChecks
* java.net.SocketPermission * connect,accept,resolve
* java.security.SecurityPermission getProperty.ssl.KeyManagerFactory.algorithm
* java.util.PropertyPermission * read,write
See http://docs.oracle.com/javase/8/docs/technotes/guides/security/permissions.html
for descriptions of what these permissions allow and the associated risks.

Continue with installation? [y/N]y
-> Installed readonlyrest
Configure ReadonlyREST
Create a new file in /etc/elasticsearch and paste a snippet that you found on the documentation page: github.com/sscarduzio/elasticsearch-readonlyrest-plugin.
vi /etc/elasticsearch/readonlyrest.ymlreadonlyrest:
access_control_rules:
- name: Accept requests from my_cloud on my_index
groups: ["my_cloud"]
indices: ["my_index"]
- name: Accept requests from cloud2 on another_index
groups: ["cloud2"]
indices: ["another_index"]
users:
- username: username
auth_key: username:password
groups: ["my_cloud"]
- username: test
auth_key_sha1: a94a8fe5ccb19ba61c4c0873d391e987982fbbd3
groups: ["cloud2"]Replace username with the real username and password with a real password.
Note the indents – they are mandatory in YAML. Otherwise you’ll get the error
Could not find required attribute 'readonlyrest' in file pidfile:/var/run/elasticsearch/elasticsearch.pid,cluster:{name=elasticsearch},node:{name=fbhajo9},path:{data=[/var/lib/elasticsearch], logs=/var/log/elasticsearch, home=/usr/share/elasticsearch},client:{type=node},http:{port=9200},network:{host=127.0.0.1}Generate the password with
pwgen -a -y 16
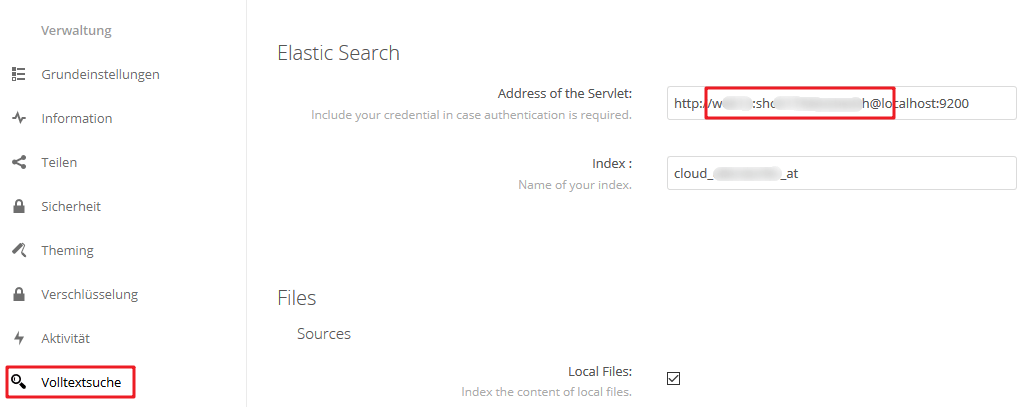
and fill in the username and password in the admin console of Nextcloud at Address of Servlet, like
http://username:password@localhost:9200

Restart Elasticsearch with service elasticsearch restart and you are done.
Live Index Service
To continuously index the files, the command
php occ fulltextsearch:live -vvv
is necessary. This can easily be achived by installing it as a service.
Create a new file
vi /etc/systemd/system/nextcloud-fulltext-elasticsearch-worker.service
[Unit]
Description=Elasticsearch Worker for Nextcloud Fulltext Search
After=network.target

[Service]
User=www-data
Group=www-data
WorkingDirectory=/var/www/nextcloud
ExecStart=/usr/bin/php /var/www/nextcloud/occ fulltextsearch:live
Nice=19
Restart=always

[Install]
WantedBy=multi-user.target
Adjust User, Group, WorkingDirectory and the path to your occ file.
Enable Service
systemctl enable nextcloud-fulltext-elasticsearch-worker.serviceCreated symlink from /etc/systemd/system/multi-user.target.wants/nextcloud-fulltext-elasticsearch-worker.service to /etc/systemd/system/nextcloud-fulltext-elasticsearch-worker.service.Start Service
service nextcloud-fulltext-elasticsearch-worker start
ps ax | grep fulltextsearch:live
5416 ? SNs 0:00 /usr/bin/php /var/www/nextcloud/occ fulltextsearch:liveCongratulations!
Your full text search engine for Nextcloud is now configured, up and running.
Increase number of search result list
vi /var/www/nextcloud/apps/fulltextsearch/js/navigate.js
410gg
var request = {
providers: providers,
options: options,
search: search,
page: curr.page,
size: 20
};